
Party ideas
Halloween Decorations: How to Create a Spooky, Welcoming Party
A memorable Halloween party doesn’t need a room full of props. A few well-planned scenes can set a spooky mood while leaving guests space to mingle and enjoy themselves. The best halloween decorations work together, giving the celebration a clear look without making the venue feel cluttered or too childish.
Start with a theme and a considered colour palette, then decide how each area will be used. This guide takes you through choosing a look, creating a focal point, styling the entrance and party areas, and setting up the table. You’ll also find practical ways to use lighting and arrange the space around guest activities, so the atmosphere feels festive without getting in the way.
Whether you’re hosting an intimate gathering or a lively party, thoughtful layers make a difference. Coordinated décor, furniture, lighting, and linens can bring the setup together. Event styling and rental essentials can help you create a polished, welcoming space without needing to source every item individually.
Key Takeaways
- Match your theme to the guests, venue, purpose, and time you have for setup.
- Layer halloween decorations with atmosphere, a focal point, and a few finishing details to keep the look cohesive.
- Plan décor around the guest journey, from arrival and mingling to food, drinks, and photos.
- Group decorations by destination and follow a simple setup checklist to make preparation smoother.
- Bring the theme together with coordinated styling and event essentials such as furniture, table linens, and party lights.
Start Your Halloween Decorations with a Clear Party Plan
A cohesive Halloween look doesn’t mean covering every wall, table, and doorway. A few well-chosen scenes can make a stronger impression than a room crowded with props. Before choosing colours or decorations, consider who’s coming, what the gathering is for, how much space you have, and how much time you can set aside for setup. These decisions help you focus your effort on the areas guests will notice and use.
Write a one-sentence theme brief to guide each choice. For example: “Create a welcoming pumpkin patch with warm autumn colours for a family gathering.” If you’re exploring the symbols and traditions behind the holiday, History and traditions of Halloween offers useful background. Keep your brief handy as you plan, and use it to assess whether each decoration belongs in the overall look.
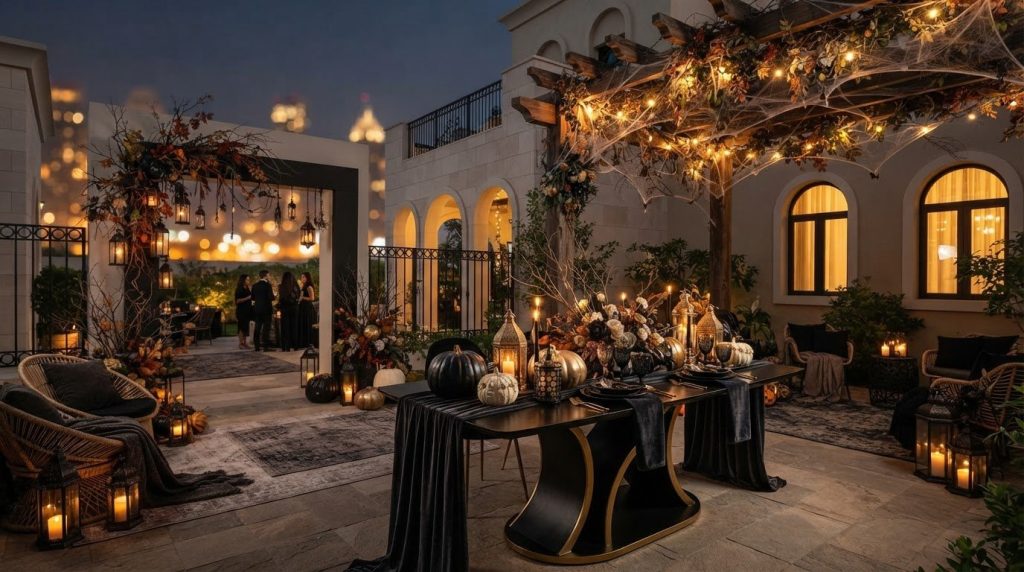
A focal point is the visual anchor guests notice first, giving the rest of your decorations a clear place to gather around. It could be an entrance display, a decorated table, or a photo backdrop. Choose a feature that suits the venue, can be seen from a natural approach, and leaves guests room to move around it.
Choose a Halloween theme that suits your guests
Playful pumpkins and friendly ghosts bring a cheerful feel, while eerie, gothic, or vintage-inspired details create a moodier celebration. Match the level of spookiness to your guests and event format. A family party may call for charming shapes and gentle surprises, while an adults-only gathering could lean into deeper shades and dramatic textures. Carry one central idea from the entrance to the gathering area and table, rather than giving each zone a different theme.
Set a palette and decoration priorities
Choose two or three main colours, then add a limited accent for contrast. Orange, cream, and black can feel classic; burgundy, charcoal, and metallic touches can create a more refined look. Repeat the palette in visible places, such as the entrance display, table linens, and photo area. This gives the eye a pattern to follow and helps simple details feel intentional.
Next, decide where your decorating effort will have the most impact. Prioritize the entrance, one gathering zone, and a memorable photo or display area. In a compact venue, a focused entry display and one table arrangement may be enough. In a larger room, use the same palette to connect separate areas without filling every open surface. Leave breathing room around the focal point so it remains easy to see and the room stays comfortable to navigate.
Before gathering supplies, make a short essentials list and separate optional finishing touches. If setup time is limited, this helps you complete the most important areas first.
- Essentials: Items that establish the theme, define the focal point, or help distinguish key party areas.
- Finishing details: Small accents that add polish if time and space allow.
Use your theme brief as a final filter. If an item doesn’t support the look or improve a priority area, leave it out. A little restraint goes a long way, and your halloween decorations can still feel festive, coordinated, and welcoming.
Build Halloween Decorations with Colour, Texture, and Focal Points
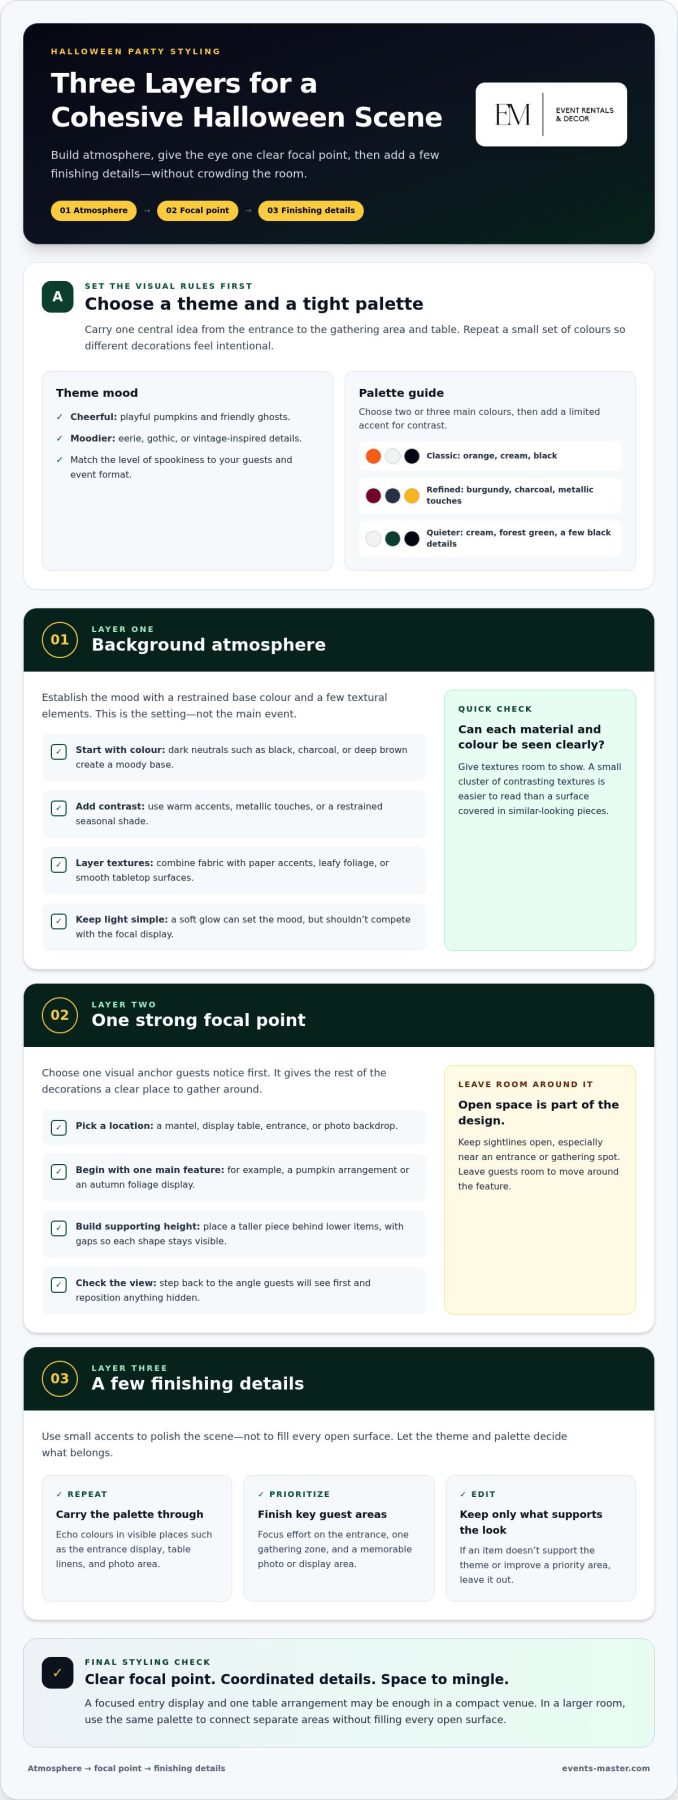
Once your party plan is in place, use three layers to make the room feel considered rather than crowded. Start with background atmosphere, add one main focal piece, then finish with a few smaller details. Each layer has a purpose, helping you create impact without filling every surface.
A consistent palette makes varied décor feel intentional, even when pieces differ in shape, material, or size. Choose colours that support your theme, then repeat them across the room to give the eye a visual thread to follow.
Create atmosphere with colour and texture
Build the background with colour. Dark neutrals such as black, charcoal, or deep brown create a moody base, while warm accents, metallic touches, or a restrained seasonal shade provide contrast. You don’t need every traditional Halloween colour. For a quieter look, try cream and forest green with a few black details, or burgundy and charcoal with a touch of gold.
Texture adds interest without introducing another colour. Layer fabric with paper accents, leafy foliage, or smooth tabletop surfaces. A dark cloth can ground a display, while lighter paper details and natural foliage break up the solid background. Give each material room to show. A small cluster of contrasting textures is often easier to read than a surface covered in similar-looking pieces.
Keep lighting simple at this stage. A soft glow can establish the mood, but it shouldn’t compete with your focal display. For practical inspiration on using small lights, explore the separate guide to styling with fairy lights.
Style one strong Halloween focal point
Choose a mantel, display table, entrance, or photo backdrop to carry the main visual story. Begin with one central feature, such as a pumpkin arrangement or an autumn foliage display, then add a few props that support it. Vary the heights to create movement: place a taller piece behind lower items, and leave gaps so each shape remains visible. Keep sightlines open, especially around an entrance or a spot where guests will gather.
Step back and look at the display from the angle guests will see first. If one item disappears, adjust its position rather than adding more decoration. Open space around a focal point is part of the design. It gives the main feature room to stand out and keeps the scene clear.
Use the three layers as a quick styling check:
- Background atmosphere: Establish the mood with a restrained base colour and a few textural elements.
- Main focal piece: Choose one display that tells guests what the theme is about.
- Finishing details: Repeat a colour or motif in small accents, then stop before they compete with the anchor.
Thoughtful spacing and a repeated palette help halloween decorations feel polished, whether you’re styling a single table or a full party area. To bring your visual plan together with event décor and styling, explore event styling with Events Master LLC.
Style Halloween Party Areas Without Making the Venue Feel Cluttered
Plan each decorated area around what guests will do there. A clear route from arrival to gathering, food and drink, and photos makes the party easier to navigate and gives each display a purpose. Rather than repeating the same setup everywhere, give each zone one job and carry the theme through with shared colours or details.
Decorate entrances and gathering spaces
At the entrance, use a small number of recognizable cues, such as a pumpkin arrangement or themed sign, to welcome guests and set the mood. Keep doors, walkways, and circulation routes open. Place larger displays beside, not within, the main path. In the gathering space, create one shared decorated area instead of scattering small scenes around the room.
Use this zone-by-zone guide to decide where each piece belongs:
- Arrival: Welcome guests and introduce the theme with a simple entrance display.
- Gathering: Give guests a comfortable place to mingle, with coordinated décor around the shared seating area.
- Food and drink: Keep serving surfaces accessible, adding small accents that don’t obstruct service.
- Photo moment: Create a composed backdrop or display where guests can pause without blocking the main route.
Think through the guest journey before placing anything large. If the entrance leads straight to a food table, for example, don’t put a display where arriving guests and people serving themselves will cross paths. Keep doors and service areas clear, with enough open space for people to move comfortably. A decoration can sit near a busy area without being in the way.
Give tables and photo spots a clear purpose
Table décor should add atmosphere without getting between guests or making serving awkward. Keep centrepieces low and leave practical space for plates, serving items, and conversation. Echo one or two details, such as the palette or texture, at the photo spot. Position a backdrop away from doorways and high-traffic paths so guests can take photos without interrupting movement.
If your party includes a tent, treat the layout as part of the styling plan. Mark the entrance, gathering space, serving area, and photo spot before deciding where decorations go. This is a useful point to consider tent rental for your event layout, especially when the celebration needs distinct zones within one covered space. Place décor around the way guests will use the venue, not just wherever there happens to be an empty surface.
Before the party, walk the route as a guest would. Check that entrances are easy to use, guests can reach the gathering and serving areas, and the photo spot doesn’t interrupt movement. Thoughtful placement lets halloween decorations make a strong impression while keeping the venue welcoming and comfortable.
Follow a Simple Halloween Decoration Setup Checklist
Preparation makes setup calmer and helps your Halloween decorations look considered from the moment guests arrive. Review the space before unpacking, group pieces by destination, and leave time for a final safety check. This sequence keeps the essentials in view and reduces last-minute searching.
Prepare decorations before setup day
Measure the main areas and sketch a simple layout. Mark guest routes, entrances, serving areas, and focal points so you can see where displays will fit without obstructing movement. Sort decorations by destination, then label containers with clear zone names such as entrance, gathering area, table, and photo spot. Before packing, check each item’s condition, attachment method, power needs, and setup instructions.
Install, review, and make final adjustments
Use your layout to place the larger elements first, then add supporting details and tabletop styling. Finish with a walk-through from a guest’s point of view. Check the overall effect as well as practical details, including stable displays, clear routes, and accessible service areas.
- Measure and map: Note the main decorating areas and sketch where guests will enter, gather, and move between zones.
- Sort by destination: Group each decoration with the area it belongs to, and label its container so items are easy to find during setup.
- Inspect the pieces: Look for damage or loose parts, confirm how items attach, and identify any power needs or setup instructions.
- Place the larger elements: Set up backdrops, display pieces, and other major elements before adding smaller accents or table details.
- Check stability and hazards: Secure displays so they’re steady, keep cords and small items out of walkways, and move decorations away from flames and heat sources.
- Walk the venue: View the setup from the entrance and follow the guest route. Adjust anything that blocks an exit, narrows a walkway, or makes a serving area difficult to use.
- Review venue guidance: Check any venue-specific restrictions that apply to attachments, electrical decorations, or the use of open flames.
Make the safety pass part of the design, not an afterthought. Battery-operated lights are a practical alternative to open flames in displays such as jack-o’-lanterns. Check electrical decorations and cables for visible damage, keep cords away from places where guests may walk, and follow the instructions supplied with each item. These simple checks help preserve the atmosphere while reducing avoidable risks.
Once the checklist is complete, you’ll have a clearer picture of what belongs where and what still needs attention. For coordinated event décor and rental essentials, explore Events Master LLC’s event styling and rental essentials.
Bring Your Halloween Decoration Plan Together with Events Master LLC
A strong Halloween setup brings the visual theme and practical event essentials into one plan. Decorations set the mood, while furniture, table linens, and party lights help define how each area looks and functions. Coordinating these choices can make the celebration feel thoughtfully arranged without relying on a room full of props.
Coordinate décor with practical event essentials
Use the same visual direction across the details guests see together. If your theme uses deep colours and warm accents, carry those tones into table linens and décor, then choose furniture arrangements that suit the gathering. The aim isn’t to match every item exactly. Repeating a colour, texture, or simple motif in a few places is often enough to connect the scene.
Furniture can also give the venue a useful structure. Dining tables establish a place for guests to sit and share a meal, while sofas, chairs, or bean bags can shape a relaxed lounging area. A cocktail table or bar can define a separate spot for mingling, and a coffee table can support a comfortable seating arrangement. Choose furniture for the activity first, then let the layout and styling reinforce it.
Table linens can connect dining and display surfaces to the theme, while party lights add atmosphere to the wider setup. Keep each choice in proportion to the space and the way guests will use it. A styled table can become a focal feature, but it still needs to work for serving and conversation. Coordinated halloween decorations and event essentials should make the room feel welcoming and help guests know where to gather.
Turn the plan into a welcoming celebration
Before putting the plan into action, bring its key details together: your theme, venue layout, guest needs, and event priorities. Note which areas need seating, where guests will gather, and what you want them to notice first. This gives décor and rental choices a clear purpose and keeps the look consistent from the entrance through to the main party area.
Events Master LLC brings event décor and styling together with rental furniture, table linens, party lights, and other event essentials for private parties and corporate functions. Share your theme and practical event needs to shape a coordinated plan for the occasion.
Plan your Halloween event with Events Master LLC to bring your theme and event essentials together.
Make Your Halloween Plan Your Own
The best party details are the ones that feel right for your gathering. Choose a final touch that gives guests a warm welcome, a reason to linger, or a memory to take home. Your halloween decorations don’t need to be elaborate to feel special. A clear point of view and a comfortable space can make the celebration feel personal from the moment guests arrive.
Events Master LLC offers décor and styling support for private parties and corporate functions, alongside rental essentials such as furniture, party lights, catering equipment, tents, and table linens. A coordinated selection of décor and practical pieces can help bring the theme into the entrance, gathering area, and table setup.
Plan your Halloween event with Events Master LLC, and bring your vision to life with a celebration that feels spirited, welcoming, and unmistakably yours.
Frequently Asked Questions
Can I create Halloween decorations on a small budget?
Yes. Choose a theme, then focus your effort on the places guests are most likely to notice, such as the entrance or a shared table. Reuse suitable decorations from previous celebrations and make a few simple additions from materials you already have. Before buying anything, compare it with your theme and checklist. If it doesn’t fill a real need, skip it. A focused plan can help halloween decorations feel thoughtful without requiring a large collection.
What are easy Halloween decorations to make at home?
Paper bats, simple garlands, decorated jars, and painted pumpkins are approachable projects that can suit different themes. For a quick, coordinated look, choose one project and repeat it in a few places, such as paper shapes on a wall and a matching garland nearby. Use secure hanging methods suitable for the surface, and keep handmade items away from heat sources and exits. Choose projects you can finish before party preparation gets busy.
How do I decorate for Halloween without making the room look cluttered?
Give each main area one clear visual job, and remove pieces that compete with it. If a decorated table is already the room’s centre of attention, for example, keep nearby surfaces simple rather than building another display beside it. Group small items on a tray or within one defined area instead of scattering them across shelves. Then check the room from the doorway and from a seat, where clutter can look different.
What colours work well for Halloween decorations?
Black and orange are classic, but the right palette depends on the mood you want. Deep green with cream can feel autumnal, while burgundy and metallic accents can create a richer, more dramatic impression. Consider the venue’s existing walls and furnishings, too. If the room already has strong colours, use a quieter palette for party details so the seasonal touches feel connected rather than competing with the space.
How can I decorate a Halloween party table?
Keep the table useful first, then add a few details that suit the party’s palette. A low arrangement of painted pumpkins or autumn foliage can add interest without interrupting conversation. If guests will eat there, leave enough room for serving dishes and avoid placing decorative items where they could be knocked into food. Keep non-food decorations separate from food-contact surfaces, and follow appropriate food-safety practices for serving and handling.
How do I make Halloween decorations safe for a party?
Keep decorations stable and out of routes guests and staff need to use. Secure hanging pieces, tidy cables so they don’t cross walkways, and keep exits accessible. Avoid open flames near paper, fabric, or other materials that can catch fire. Flameless lights are a practical alternative for displays such as carved pumpkins. Before guests arrive, inspect electrical decorations for visible damage and follow their instructions and any rules set by the venue.
When should I put up Halloween decorations?
Work backward from the gathering date rather than choosing a fixed day. First settle the theme and layout, then prepare handmade details and sort stored decorations before setup. On setup day, place larger elements before smaller accents so you can adjust the arrangement as the space takes shape. If you’re using a venue, plan installation around its agreed access arrangements. Leave time before guests arrive to check the setup and put away unused items.